Installation Tips for Tungsten Carbide Bushings: Avoiding Common Mistakes

Even the best tungsten carbide bushings can fail early if they are installed incorrectly.

These components are designed to handle extreme wear, high pressure, and temperature, but poor handling or improper fitting can cause cracks, misalignment, or performance loss.

A correct installation ensures that the bushing achieves its full design life, maintains precise shaft alignment, and prevents leakage or vibration.

In this guide, we will cover key installation tips, common mistakes, and best practices for engineers and technicians.

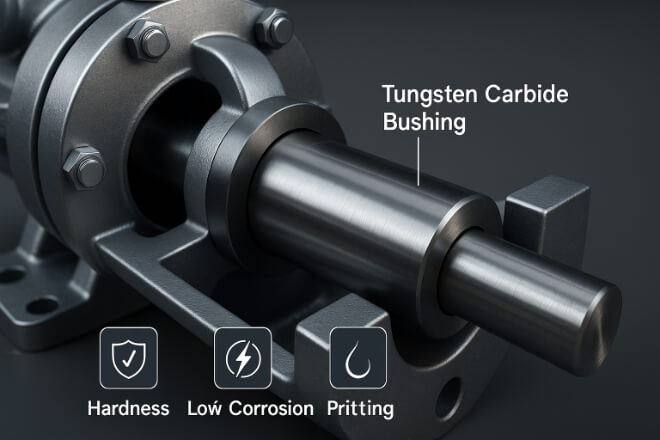
Understanding Tungsten Carbide Bushings

Tungsten carbide bushings are hard, precision-engineered components used in pumps, compressors, gear systems, and other rotating assemblies.

They serve as bearing sleeves or wear rings, minimizing friction between moving parts.

Because tungsten carbide is extremely hard but somewhat brittle, handling and installation require special care.

The goal is to fit the bushing securely without applying stress that could cause cracks or deformation.

Step 1: Inspect Before Installation

Always start by inspecting the bushing and housing before installation. Even a small scratch or particle can compromise alignment and performance.

Item What to Check Por qué es importante
Bushing Surface No chips, cracks, or visible defects Cracks may grow under pressure, leading to failure
Housing Bore Clean, free from rust or debris Ensures uniform contact during press-fit
Dimensiones Verify ID, OD, and length within tolerance Prevents excessive press-fit or loose fit
Cleanliness No oil, grease, or dirt on bonding surfaces Ensures strong, stable mechanical contact

If you detect hairline cracks or surface flaws, never attempt to install the bushing — replace it immediately.

Step 2: Choose the Right Installation Method

There are several methods to install tungsten carbide bushings depending on the application and housing type.

Choosing the correct method avoids stress concentration and ensures proper fit.

Method How It Works Mejor para
Press Fit Bushing is pressed into housing under controlled pressure General-purpose pumps and compressors
Shrink Fit Bushing is cooled or housing is heated for thermal expansion fitting High-temperature or high-precision assemblies
Adhesive Bonding Epoxy or adhesive used to fix bushing in place Non-metallic housings or low-load environments

Tip: Avoid hammering or forcing the bushing into place — tungsten carbide is hard but brittle, and impact can cause hidden fractures.

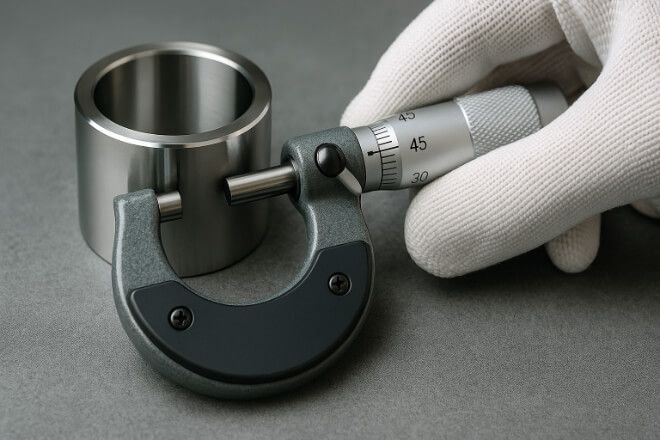
Step 3: Control the Fit Tolerance

Proper interference fit is essential. If it’s too tight, the bushing may crack. If it’s too loose, it may rotate or leak.

Typical recommended fits for tungsten carbide bushings are:

  • Press fit: 0.02–0.04 mm interference

  • Shrink fit: 0.03–0.06 mm interference

  • Adhesive fit: 0.01–0.02 mm clearance

Use micrometers or precision gauges to confirm tolerances before assembly.

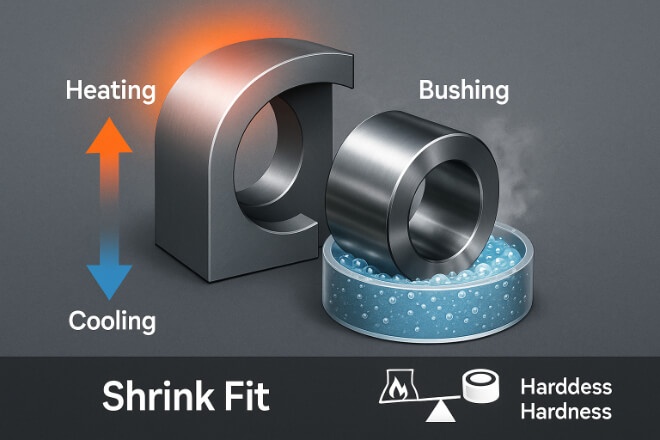
Step 4: Use Proper Heating and Cooling Techniques

For shrink fitting, temperature control is crucial. The housing can be heated to expand, or the bushing can be cooled using liquid nitrogen.

  • Heating: 150–250°C (do not exceed 300°C)

  • Cooling: Down to -196°C for LN-assisted fits

Make sure to heat or cool evenly to prevent thermal stress or cracking. Always let both parts reach room temperature before operating the equipment.

Step 5: Alignment and Lubrication

Before inserting the shaft, check that the bushing bore is perfectly aligned with the housing. Misalignment can lead to uneven wear or even shaft seizure.

Apply a thin layer of assembly oil or anti-seize compound to prevent galling during start-up.

For dry-running systems, ensure the surface finish is fine (Ra ≤ 0.05 µm) to minimize friction.

Step 6: Avoid Common Mistakes

Even experienced technicians can make installation errors. The following table lists frequent mistakes and how to avoid them.

Mistake Result Solución
Hammering during installation Cracked or chipped bushing Use a hydraulic press or thermal fit method
Dirty or rough housing bore Poor seating, misalignment, vibration Clean and polish bore before installation
Overheating the housing Thermal expansion cracks or distortion Do not exceed 300°C and heat evenly
Incorrect tolerance fit Loose bushing or premature wear Check with gauge before installation
No lubrication Friction and surface scoring Apply thin oil film before inserting shaft

Step 7: Post-Installation Checks

After installation, always perform the following:

  • Verify runout and concentricity using a dial indicator.

  • Ensure no gap between the bushing and housing.

  • Rotate the shaft manually to confirm smooth movement.

  • Conduct a pressure or leak test if used in a pump or compressor.

These steps confirm that the bushing has been properly installed and seated without stress.

Conclusión

Installing tungsten carbide bushings requires precision and care.
A properly installed bushing will offer:

  • Extended wear life

  • Stable alignment

  • Lower maintenance frequency

  • Improved reliability of critical rotating equipment

Following correct installation practices protects your investment and ensures your equipment runs smoothly — even in the harshest industrial conditions.

Si desea conocer más detalles sobre alguna empresa, no dude en contactarnos. Contáctanos.

Deja una respuesta

Tu dirección de correo electrónico no será publicada. Los campos obligatorios están marcados con *